DSL With the Cisco 67x Router
Connecting to ZiaNet with
DSL and the Cisco 675 or 678 is fun and easy. It Slices, dices, makes Julian Fries,
and cuts great swathes of bandwidth through the 'net.
First a few notes about this document. This will cover the configuration of both
the 675 and the 678 routers from cisco. For the most part, They're essentially the same,
the 678 has 4 extra lines of configuration to enter.
 Before
we get into this, we need to make the assertion that the Commander software
does very little to actually get us connected to ZiaNet, and it's only
really useful purpose is to give statistics once the connection is established.
So we will configure this by talking to the router directly. Before
we get into this, we need to make the assertion that the Commander software
does very little to actually get us connected to ZiaNet, and it's only
really useful purpose is to give statistics once the connection is established.
So we will configure this by talking to the router directly.
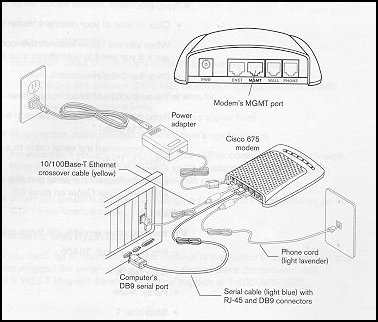
To start with, we need to make sure everything is hooked up properly. This Documentation assumes that the customer has already installed the NIC card that came with the router kit, or that a NIC card is already present, and that all software associated with the NIC is already installed and functional. Remember, Zianet does not pop the skin on computers, so NIC install is the province of the computer manufacturer or of the NIC manufacturer. The diagram at left shows you how to get all the cables hooked up. Other than the power cable, there are three cables that come with the 675. A Light Lavender Cable Connects between the phone jack of the wall and the port labeled "WALL" on the back of the router. A Light Blue cable connects between a serial connection on the back of their computer, and the port labeled "MGMT" on the back of the router. A Yellow cable connects between the NIC Card of the Computer and the port labeled "ENET" on the back of the router. There is one more port on the back of the router, labeled "PHONE" which is where you connect a standard phone if desired. *Note - The kit comes with 3 "line chokers" that are made to filter DSL signals from voice communication. DO NOT install a "line choker" between the router and a phone, it's built into the router. |
| Okay, Now that everything
is hooked up, we need to talk to the router. This is accomplished in Hyperterminal.
Open up Hyperterminal by clicking: Start > Programs > Accessories > Communications
> Hyperterminal. Then Double Click the "Hypertrm" Icon. *Note - You may
have to install hyperterminal. Its in Control Panel > Add/Remove Programs
> Windows Setup Tab > Communications > Details. You should know how to
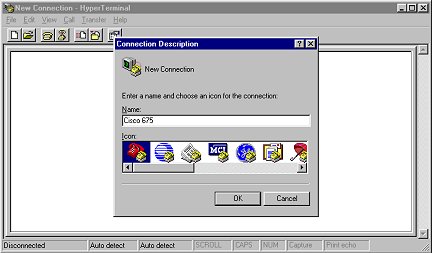
take it from there. When Hyperterminal first opens, it will prompt you
for a name of the connection you're trying to establish. Type "Cisco 675",
then click OK.
Next will be a basic setup screen, asking you for phone number, etc. Don't worry about putting in a phone number. Instead, where it says "Connect Using", tell it to connect Direct to ComX, where "X" corresponds to the Com (Serial) port the Light blue Management cable from the router is connected to. Click OK.
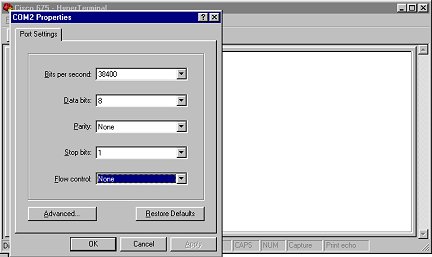
Next, We need to set up the communication parameters that allows us to talk to the router. Bits per Second is 38400, Data Bits is 8, Parity is None, Stop bits is 1, and Flow Control is None. Make sure that these parameters are set exactly. Click OK.
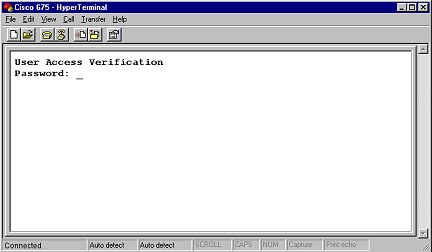
Now we should be talking to the router. When the window first opens up you wont see anything. Have the customer tap the ENTER key Once, and you should get a prompt. If it doesn't come up, try the ENTER Key again. If it still doesn't come up, either the cabling isn't set up right, or the com port is incorrect. You can change the com port by going to the file menu, and choosing properties. If we do get a prompt, it should look like this:
Okay, now we're ready to configure
the router. Below is a type of "transcript" of what commands should be
entered. Anything in brackets "[ ]" are comments or directions and are
not intended for the user to type them. When you have "cbos>" or "cbos#",
that is the router's command line prompt. Anything in bold is what
the user types.
|

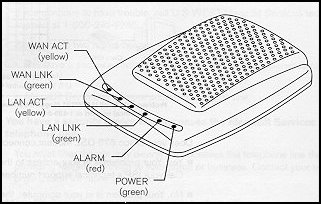
| Now's a good time to explain
the LEDs on the Router itself. After rebooting the router, you should find
that there are at least a few fully lit LEDs and a few that blink according
to the amount of traffic that's moving. here's a diagram of the front of
the router:
You can tell if your connected to ZiaNet and USWest with the WAN Link Light. It should be Solidly lit. The LAN Link light should also be steadily lit, as it indicates that the router is talking to your computer. WAN Act and LAN Act blink on and off, indicating traffic is moving over their respective connections. The alarm LED should be off. If it isn't, Call USWest. Something's wrong with the Hardware. |
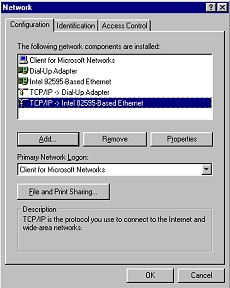
| Okay, we're almost done.
We can close out of Hyperterminal now. Next we need to configure Network
in the control Panel. The only thing we really need to configure is the
TCP/IP -> Network Card Protocol.
Click on the Appropriate TCP/IP -> Ethernet Card Protocol, then click on Properties.
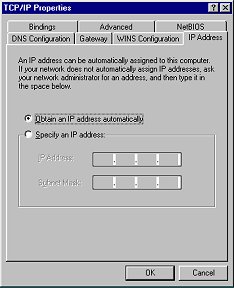
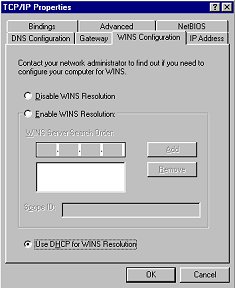
As per usual, IP Address is Obtained Automatically. Next, Click on Wins Configuration.
Make Sure that Use DHCP for WINS Resolution is chosen.
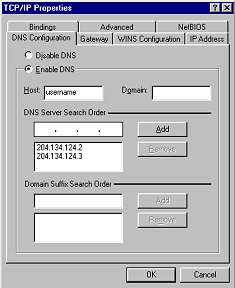
Finally, click on and set up DNS Configuration exactly the way you normally would on a Dial Up Connection. Click OK, Click OK Again, and then Click Yes when windows offers to restart the computer. Congratulations! When the computer's back up, you should be able to open a browser, and surf with style. ;-) |